Building Flappy Bird #9 – Visuals and Beautification
In this section, we’ll do a little cleanup, and finally cover the steps to build to different devices.
The first thing we need to do is randomize our bubble heights. While we can pop them easily, we really want some variation to make it feel more polished.
To accomplish this, we’ll use a familiar technique. UnityEngine.Random
Open the Bubble.cs script.
We need to make two changes here. First, Change the Reset() method to match this
void Reset()
{
  float randomHeight = Random.Range(-8f, -18f);
  transform.position = new Vector3(transform.position.x, randomHeight, transform.position.z);
}
This will give us a randomized starting height for the bubble.
If you play now, you’ll notice the bubbles are still coming at the same time. The reason this happens is we aren’t randomizing until after the bubble has been popped and reset. To fix this, we’ll just call reset when the game starts.
In the Bubble.cs file, add a new method named Start() that will call Reset()
Start is another built in method that we’re going to hook into. It’s called when the scene starts or when a new GameObject is first added to the scene.
Your final Bubble.cs script should look like this
using UnityEngine;
public class Bubble : MonoBehaviour
{
  [SerializeField]
  private float _moveSpeed = 1f;

  void Start()
  {
    Reset();
  }

  // Update is called once per frame
  void Update()
  {
    transform.Translate(Vector3.up * Time.deltaTime * _moveSpeed);
    if (transform.position.y > 10)
    Reset();
  }

  void Reset()
  {
    float randomHeight = Random.Range(-8f, -18f);
    transform.position = new Vector3(transform.position.x, randomHeight, transform.position.z);
  }

  void OnTriggerEnter2D(Collider2D other)
  {
    if (OtherIsTheFish(other))
    {
      ScoreKeeper scoreKeeper = GameObject.FindObjectOfType<ScoreKeeper>();
      scoreKeeper.IncrementScore();
      Reset();
    }
  }

  bool OtherIsTheFish(Collider2D other)
  {
    return (other.GetComponent<Fish>() != null);
  }
}
Play Time
Now try playing again.
Because we call Reset when the game starts, all of the bubbles have a random initial height.
Bubble Colors
Our current bubble is pretty grey, it’s time to lighten it up a bit.
If you have access to Photoshop (there’s a free trial available), open up the bubble.png file and we’ll make an adjustment to it.
Optional – Photoshop
If you don’t have Photoshop, or just don’t want to edit the image, you can skip this section and download the modified version in the next section.

With bubble.png open, select Image->Adjustments->Levels
Move the left slider or type in the value 77

Save your file and notice how much brighter your bubble is.
Alternative – Download the Bubble
The modified bubble is available for download here https://drive.google.com/file/d/0B-lckWH-cZaianllZHlURFZRcVk/view?usp=sharing
Just download it to your Art folder inside your Unity project and replace your existing bubble.
Material Changes
Now we’re going to adjust the alpha channel on our bubble material.
The alpha channel controls transparency. We’ll be increasing the transparency (actually reducing opacity) to make our bubble look a bit better.
In your scene, select one of the bubbles, then look to the inspector.

Find the Color section and click on it
Adjust the Alpha channel to 170 and watch the bubble get a little transparent.
Background Time
Right now, our background is pretty dull. It’s hardly a background at all, it’s really just a boring solid blue.
Let’s fix it!
Download this gradient color image https://drive.google.com/file/d/0B-lckWH-cZaiQVd3SnFDbmc0bXc/view?usp=sharing
Place the GradientBackground.png file in your Art folder.
Create a new Sprite

Name your sprite “Background”

Using the sprite picker, select the GradientBackground that you just downloaded


Adjust the transform values to match these

Background Transform values
Where’s my stuff??
You may be wondering where your fish and bubbles have gone…
Does your screen look something like this?

If so, don’t worry!
We just need to adjust the “Order in Layer” value on the Sprite Renderer
Order in Layer determines what order the sprites are drawn in. Sprites that are drawn later will always cover sprites drawn before them (unless they’re transparent like our bubble).
Set “Order in Layer” to -1

Horray!
Your scene view should now look like this

Good work making your game look better.
Personal Touch
Now, I want you to add a bit of your own touch to the game.
Find a new background that you really like and put it in place of the gradient.
I’d recommend you find an image on google using a search that resembles this
When you put in your own custom image, you’ll need to adjust the size of the transform to make it fit right and not be stretched out.
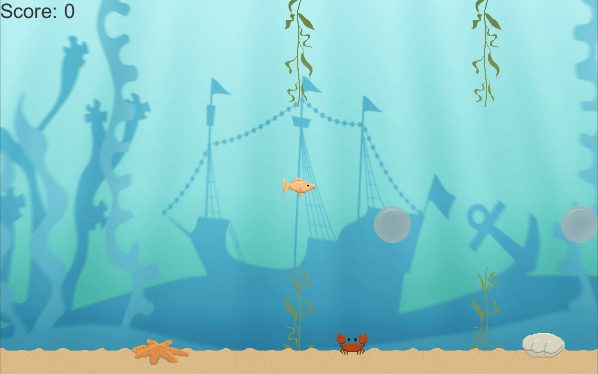
Here’s what my final version looks like.

Now that you’ve finished yours, post a screenshot in the comments and show everyone what you’ve done!
Sharing
Up Next: Building Unity Projects – We’ll cover how to get your game built and shared with your friends on PC, Mac, Android, and in a web browser.

