Prefabs – Moving with Parents
If you’ve followed along so far, you have a pretty fun game. You can fall down and die, or keep hitting space to stay alive.
While I’m sure that will lead to hours of fun, let’s try making it a bit more difficult.
Adding the Top
The first thing we need to do is add a top seaweed.
To do this, we’ll duplicate the bottom one, then move it, and flip it over.
Select the seaweed in the Hierarchy

Right Click and select Duplicate (the hotkey for this is ctrl-d or cmd-d)

The duplicate should be selected automatically and be named seaweed (1) since it’s the first duplicate.
Set the rotation Z axis of the new seaweed to 180.

Set the position Y value to positive 6.
Your Game View should look like this

Go ahead and hit play. Try to balance between the 2 seaweeds without dying.
Clean Up
Let’s do a little cleaning of our game object names.
Rename the bottom seaweed from “seaweed” to “seaweed bottom”
If you don’t remember how to rename, select the seaweed in the Hierarchy and hit F2. Alternatively you can rename it in the Inspector by typing where the name is.

Next, rename the top seaweed from “seaweed (1)” to “seaweed top”.

While the names of these game objects doesn’t technically matter, it’s useful for us to have good names for our objects. It makes them easier for us to find and differentiate later in our development.
Empty Game Objects & Parenting
Now, we’re going to create a Game Object that has nothing other than a transform.
To do this, select GameObject->Create Empty from the menu.

You should see a newly created Game Object in your Hierarchy with the name “GameObject”

Let’s rename this right away to “seaweed parent”

Now set the X, Y, & Z values of the position to 0. If the were already 0 for you don’t worry about it

Becoming Children
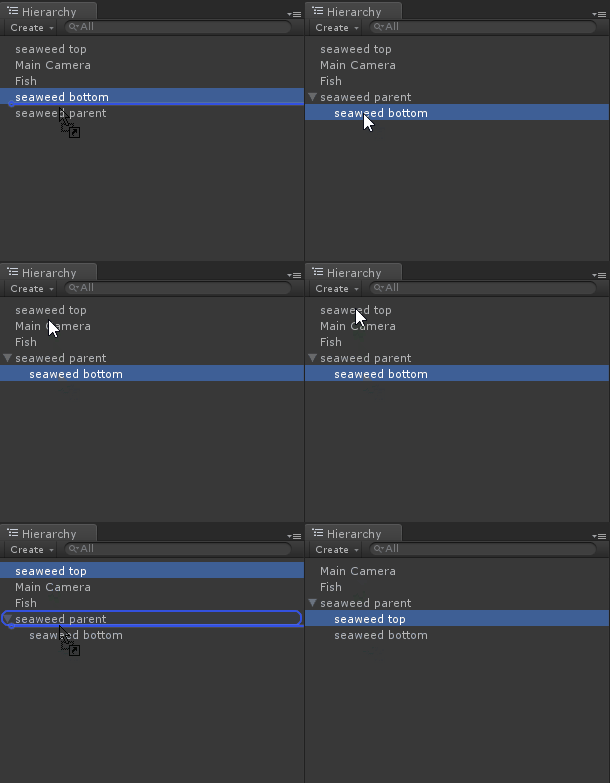
Next, we’re going to make our seaweed bottom & seaweed top into children of seaweed parent.
To do this, just drag them one at a time in the Hierarchy view onto the seaweed parent.
Now that the top and bottom are children of the parent, changes to the parent will affect them.
If you move the seaweed parent around, you’ll see the children move along with it, but always stay the same relative to each other.
If you haven’t done it already, go over to the Scene View now and try moving around the seaweed parent.
Select the move tool

Move it around
Now let’s reset the position to 0, 0, 0

Prefabs
A Prefab is a GameObject that exists in your Project, not only in a Scene.
Think of them like a blueprint or design of a GameObject that you want to re-use multiple times.
Since we want to create a Prefab now, let’s first make a folder to hold our Prefabs.
Right click and Hit Create->Folder

To create a prefab, you can drag a GameObject from the Hierarchy to a folder in the Project View.
You’ll notice the “seaweed parent” turned blue.
A blue GameObject is using a Prefab. (if you see a red GameObject, that means it’s using a Prefab but the Prefab is broken or missing)
Duplication
Now we need to add a few more seaweeds to our scene.
To do this, select the “seaweed parent”, right-click, and select Duplicate.
You should see a GameObject named “seaweed parent (1)”

Look to the Inspector and set the X value of position for “seaweed parent (1)” to 5.

You should now be able to see your second seaweed, it’s just moved a little to the right. (5 units to be exact)

Now, let’s recombine our Scene and Game views back into tabs so we can get a bigger view of the Scene.
If you’ve dragged your Scene or Game view to a second monitor, you don’t need to do this.

Select the Scene view tab and zoom out using your mouse wheel or touch pad.
Duplicate your seaweed parent again. (or the copy of your seaweed parent, they’re both the same thing)

Set the X position of the new one to 10. (in the inspector)
Repeat this process 4 more times. Each time, add 5 to the X position.
The end result should look like this


